Sunday, December 25, 2011

(Healthy!) Turkey salad

Leftover turkey from Christmas? Look no further, I have solutions! Firstly, save the carcass and make some simple, easy and delicious turkey stock as I documented in a post-Thanksgiving blogpost. But what about mountains of turkey leftover that you want to eat now? I love chicken and turkey salad, but I find it's always laden with an overabundance of mayo. Don't get me wrong, I have nothing against a touch of mayo here of there, but I find it a bit excessive and frankly, gross, when there are gobs of it in what I'm eating. Here's a fresh alternative that hits the same spot. Let's get cracking!

(Healthy) Turkey Salad
Ingredients
1 cup turkey, in chunks (mine were about 1 cm cubed)
3 tablespoons thick, plain Greek yogurt
1/2 quartered grapes or raisins
2-3 tablespoons chopped onions
1/2 teaspoon Sriracha
LOTS of dill, chopped (1-2 tablespoons, but you can also use cilantro, parsley, tarragon, etc.)
1/2 teaspoon cumin
A handful of walnuts or pecans, broken in pieces
1-2 teaspoons lemon juice
Salt and pepper to taste

Note: chopped celery, fennel or cubed apple would all be nice additions too!

Directions
Add ingredients. Stir to mix. Pretty simple, eh? Serve on salads, sandwiches, wrapped in rice paper or lettuce leaves, or fork and extra bite straight from the fridge (my modus operandi).


I ran out of grapes so I added some extra raisins to balance it out.


Nothing better than some chopped onions!
Most ingredients
Sriracha is my one true love
I mixed walnuts and pecans
All mixed together
Yummm, a post-studying snack!

Tuesday, December 20, 2011

Lessons from Zambia - Chicken Killing revisited and Lasagna Mush

Check out my newest blog-post and story on Open View Gardens, a blog about local and sustainable eating paired with culinary diversity! I have been friends with one of the co-founders, Liz Ganley-Roper since we were 16, and as a foodie and fellow traveler, I was honoured when she asked if I would contribute.

Curious about how I wove together chicken-killing, travel and quality Lasagna Mush (which is neither mush, nor lasagna mush, but that's irrelevant)? Click here and discover for yourself...

Sunday, December 18, 2011

I should take a note from them

Click here to read a few adorable things kids say. My favorite? It's a toss-up between, "Love is when a girl puts on perfume and a boy puts on shaving cream and they go out and smell each other," - Karl, age 5, and "Love is when you go out to eat and give somebody most of your french fries without making them give you any of theirs," - Chrissy, age 6.

Friday, December 16, 2011

Western food vs. Asian food - chemically different?

This might be why I like Asian food so much - dissimilar chemical flavour combinations! Click here to read more...

Thursday, December 15, 2011

Holiday Time! White Chocolate Apricot and/or Cranberry Cookies

I'm a bad blogger! I figured with the holidays around the corner I'd have more time to post, but apparently that's not so. Lots of studying and huge chunks of time spent out of the house have me hankering for some quick homemade goodies, of which these do the trick. The recipe stemmed from my mom's original, old-school chocolate chip cookie recipe, but I've made some major changes to get it to the point that it's at below. Just to note, the recipe below is a boubled version of the original, but when we make it at home we always double it (it makes about 18-20 cookies). If you want a smaller batch, just halve all the amounts.

White Chocolate and Apricot and/or Cranberry Cookies

Ingredients
1 cup brown sugar
1/2 white sugar
2 eggs
2 tsp vanilla
1.5 sticks unsalted butter (if using salted butter, omit salt below), fridge temperature, cut into large chunks
2 cups flour
1 tsp baking soda
1 tsp salt (if using unsalted butter)
1 tsp cinnamon (or a touch more)
1 tsp cardamom
1/4 tsp nutmeg (optional)
1/4 tsp ground ginger (optional)

1/2 bag of white chocolate chips (or chocolate chunks), or about 1.5 cups, or until is looks like enough!
about 1.5-2 cups dried cranberries and/or chopped dried apricots and/or chopped dried figs
approx 1/2 cup walnuts or pecans, broken into big pieces

Directions
Preheat oven to 375 F. With a standing mixer, handheld mixer, or by hand, beat both sugars, eggs, vanilla and butter until combined. Here's where people go wrong - you DON'T want the mixture to be perfectly mixed, you still want chunks of butter! I don'y know why, but it always makes my cookies come out better. To do so, you need to start with butter that's about the temperature of your fridge, not completely melted.

Sugar

Combined initial ingredients

Do not beat it much more than shown here!! There should be chunks of butter still remaining.

Add the flour, baking soda, salt and spices. Mix to combine.

Added flour
Mixing until combined
Add white chocolate, dried fruit and nuts. Mix until just combined. Form into balls and place on UNgreased cookie sheets. Another trick of mine is not to overshape the cookies - you want them chunky and kind of un-smooth (see below). Again, I can't tell you why, but I promise they come out tastier! Bake for 10-13 minutes at 375 F, or until slightly browned at the edges but still puffy at the center. They will continue to cook slightly as they cool. Transfer to rack (if you have one) to cool. Dip in milk and enjoy!
Finishing touches
Wonderful un-perfectly-formed cookies. Look at those chunks! Look at that asymmetry! Exactly what you want in a home-made cookie.
My baking partner
Sometimes when I feel mean, I put batter on Lulu's nose and watch her lick it off. Yes, I'm about 12 years old.
Finished cookies!
Note: For Viv's choc chip cookies, take out all of the spices (cinnamon, ginger, nutmeg, cardamom...although sometimes I add cinnamon for good measure), and replace the fruit and white chocolate with semi-sweet chocolate chips (NOT milk chocolate - they're too sweet!). Yumyumyum!

Tuesday, December 13, 2011

What NOT to buy a cook for the holidays

Don't buy me any of these. Ok, maybe the brass knuckle meat tenderizers, but just for when I walk in sketchy parts of town...

Thursday, December 8, 2011

Easy Indian Veggie Curry


Cooking can be a release, a much-needed break from studying or a pleasurable unwinding activity after a long day at work, but it can also be stressful, straining, and annoying when you're hungry/not sure what you're doing/exhausted/the take-out place is right down the block. Such was my week - parental units out of town and studying for a pesky physics exam (tonight), I remembered what it was like not to cook out of merely pleasure (as I have had the awesome opportunity to do recently), but out of necessity. With a hankering for Indian spices and lack of a good, quick and healthy (read: not butter chicken) place nearby (or at least that I know of nearby - I love the places up on Jean Talon but it's much to far of a trek for a quick dinner on a Tuesday night), I decided to trust my internal judgement and go for it on my own, without recipe. What materialized may or may not be true Indian cuisine, but it successfully hit the spot for a hearty-yet-light, warm, easy weeknight dinner, with just enough leftovers to tide me to the next day, but not so much as to overwhelm me. Give it a try, and as always, play around! This would be great with different types of veggies and legumes (as I mention below in the recipe), with a bit of cream or yogurt stirred in at the last minute (if you crave a creamier dish) and served atop rice, quinoa, couscous, or barley. 

Easy Indian Veggie Curry

Ingredients
Olive oil
1 medium onion
3 cloves garlic
1-2 teaspoons fresh chopped ginger
Saffron ** very optional**
1 small-medium eggplant, cut into quarters lengthwise and into 12-1 inch chunks
1 zucchini
1 turnip (optional)
Cumin (essential!)
Hot curry powder, or other spicy powder
Ground coriander (optional)
Cinnamon (optional)
1/2 - 1 cup white wine (optional, but highly recommended)
Canned whole or stewed tomatoes, or 2 large fresh tomatoes in chunks
any other quick-cooking veggies you like! I used cabbage shavings, but feel free to substitute green beans, broccoli, cauliflower, kale, spinach, chickpeas, beans etc.
Water, chicken stock or veggie stock if necessary
Salt and pepper
Chopped cilantro or parsley as garnish

Serve atop quinoa, brown or white rice, couscous, barley, or potatoes!


Directions
Smash garlic with the side of a big knife (using your palm - see photo), remove skin, and chop finely. Cut onion in chunks. Heat oil in a pan slightly and add garlic, onions and ginger (and saffron is using, but very optional! It's $$ and I have leftover from Zanzibar), stirring every so often (lower heat if getting burned/too brown!), about 5-7 minutes. 
Smashing the garlic: Hit the flat side of a big knife with the palm of your hand to crush the garlic, but careful not to cut your fingers!
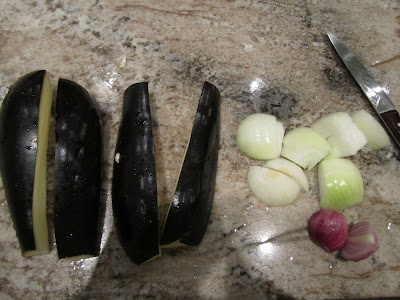
Some prepped veggies
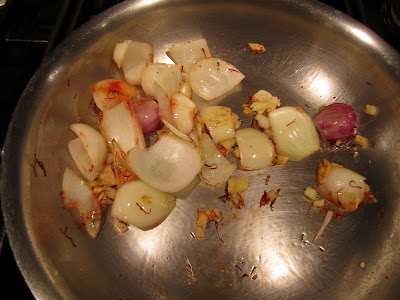
Softened onions, garlic, ginger and saffron
Add eggplant to pan. Add a touch more oil if the eggplant seems dry. Cook over medium-low heat about 5 minutes until browned. Move eggplant around every couple of minutes but DO NOT stir constantly - the dish will turn into baby mush!
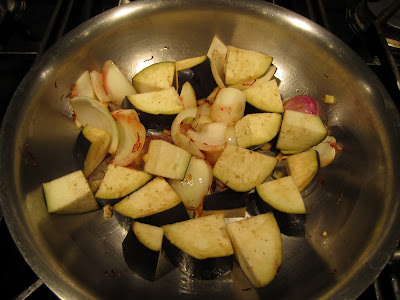
Eggplant addition
Add zucchini, turnip (if using) and about 1 teaspoon cumin, 1/2 teaspoon curry powder, 1/2 teaspoon coriander, 1/4 teaspoon cinnamon, and salt and pepper to taste. Cook over medium heat, about 4 minutes, until slightly browned. The pan should be hot and seem a bit dry. Add 1/2 cup of white wine (or water/chicken stock/veggie stock, if not using white wine), deglaze (aka: scrape) bottom of the pan, lower heat slightly and cover, cooking about 5 minutes.
Turnips - some of the last veggies remaining from my dad's garden (remaining in our fridge, I mean!)
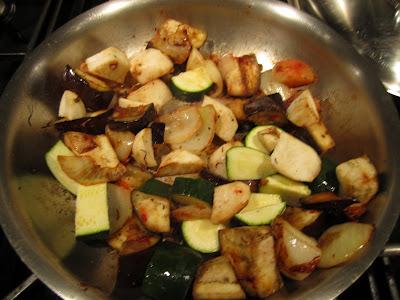
With turnips and zucchini
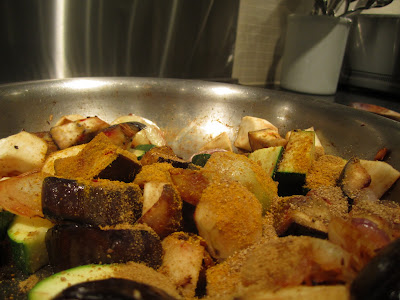
Spices added

Add tomatoes (squish them though your fingers if they are whole!), anywhere from 1/2 a container to a whole container, depending on your tomato preferences. Stir, and again, cover at a medium low heat, checking and stirring periodically, adding water or stock if it seems dry - there should be some thickening liquid at the bottom - about 10 minutes or until all veggies are soft (pierce with a knife to determine!).

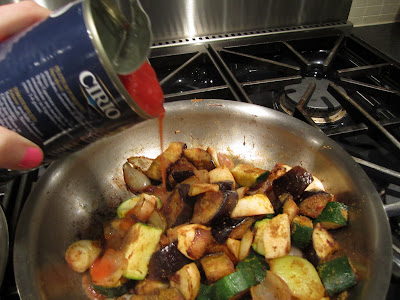
Adding tomatoes (canned or fresh will work!)
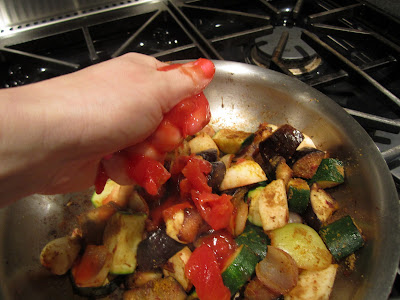
Squish them through your fingers - the best part!
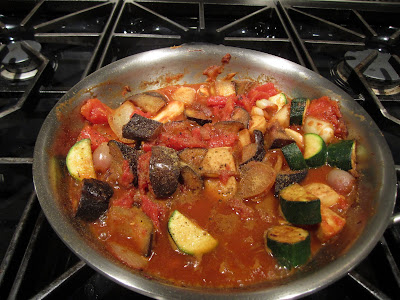
Let simmer, covered or not, until soft and the liquid has thickened
At this point I like to taste it and I usually add about 1 more teaspoon of cumin (I love the stuff), some more hot curry powder and salt. Stir to combine. Add any other veggies you're using (quick-cooking ones - see above!), stir, and cover until soft, about 5 minutes. If there is too much liquid, cook it off with the cover removed. Not enough liquid while you're cooking the soft veggies? Add a bit more!

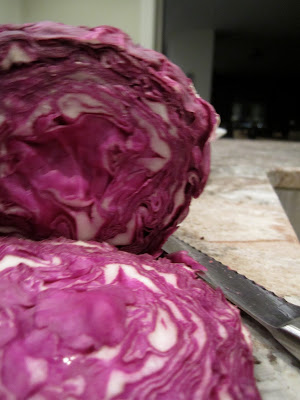
Another remaining veggie from Robin's garden
Soft-veggie addition (cabbage, in my case)
Sprinkle with chopped cilantro and/or parsley and serve!
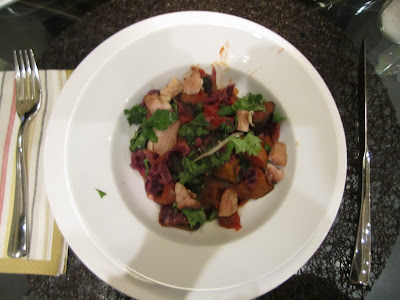
Ta-daaaaa!
Note: I had leftover chicken, so I sprinkled that on top, but I would highly recommend adding beans or chickpeas at the last step (soft-veggie addition) to ensure a bit of protein in the dish!
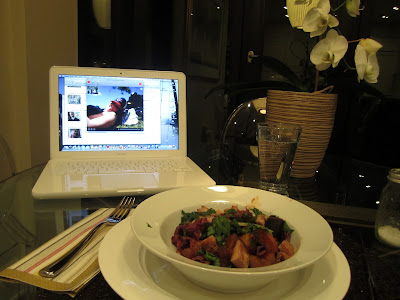
Eat with love, while Skyping with a BFF in Australia (hi Ali!)

Wednesday, November 30, 2011

What was your sex-ed like?

What was your sex-ed like in high school? Did you ever talk about pleasure as an element of sexuality? Doesn't that seem like an important - yet overlooked - aspect? Check out this article in Sunday's New York Times Magazine that discusses the topic of pleasure in the high school sex-ed classroom. Click here to see it, and tell me what you think!

A belated post-Thanksgiving post

This post is a little bit delayed and I sincerely hope I'm not missing the boat... really though? Who is as crazy as I am? Who thinks to save the bones of a decimated turkey post-Thanksgiving? Well, hopefully some people do, or some people have turkey on Christmas too. Or some people are really curious how to make a great stock.

I realize, to most stock-making seems cumbersome and time-consuming, but I promise, it's one of the easiest things you can to to spruce up your cooking. And plus, in today's day and age when the hot thing (or the healthy thing) is to be environmentally friendly, may as well use every possible part of the animal you've eaten. And it will save the extra carboard packaging from the prepackaged chicken broth, and, although you see me pouring in a handful of salt (it's kosher salt! not as strong!), I would bet that there's more 

Turkey (or chicken, or beef, or lobster) Stock
Ingredients
1 turkey or 1 chicken (or two!) or any bones (beef, chicken, lobster shells, etc)
2-3 large stalks of celery, cut in 1-2 inch pieces
2-3 large carrots, cut in 1-2 inch pieces
1 large onion, cut into chunks
3-4 thick slices (several millimetres) of ginger, outer peel cut off (optional)
2-3 Bay leaves (optional, but highly recommended)
2 pinches saffron (optional)
Any fresh herbs you might have lying around (thyme, parsley, oregano, etc)
8-10 cups water
LOTS of salt (kosher or regular - you will need a larger volume of kosher salt than regular salt, if using)
pepper

Directions
Stick it all in a pot EXCEPT for the salt. Heat it up to a rolling boil. Lower slightly if it's bubbling over - you want it bubbling but not angry. Keep it like this for about 1.5-2 hrs. Skim the top with a big spoon every so often to get rid of any gucky stuff that floats to the top. Add salt midway through. When you think its done, taste it. It should taste like a light broth - flavourful but a little too light to be soup on its own. 

Prepped veggies
Our frozen turkey carcass! Yes, I'm a little crazy. At least I didn't name her...
Sticking it all in! (The turkey didn't fir in completely, so once soft I cut it into smaller pieces)
Kosher salt
Adding my favourite ingredient to the mix


With a touch of saffron

At this point, you can either strain and freeze right away, or if you're like me, stick it in the fridge so the fat/gunk solidifies. Once it's cool, skim the top again (it'll be easier now). Remove bones. You can either strain the broth if you want it totally clear, or merely ladle it into Ziplock containers carrot/celery/onion chunks and all, and either freeze for later use (vegetable soup, butternut squash soup, braised leeks, etc) or use immediately!


Congealed gunk on the top once cooled in the fridge. Skim off and remove bones.
Putting the finished product in containers for later use!

Thursday, November 24, 2011

When life gives you lemons, make lemon squares

There's no beating around the bush; bad days are inevitable. What to do with an awful day? Methodical, precise, artistic, and meditative, baking calms me down and gives me purpose. So on bad days, distract yourself with some baking. And if stuff goes wrong, no one has to know but you, since you're alone in your kitchen. And there are no lasting repercussions. And if you need an excuse to cry, well, your crust isn't going to judge you. So when life gives you lemons, make lemonade. Or, if the season doesn't really lend itself well to lemonade, (five inches of snow on the ground doesn't really scream "lemonade!"), make lemon squares. And feel accomplished when you do:)

*Note: this recipe can easily be made gluten-free (as I did, this time around) by using brown rice flour. It causes the crust to be slightly more brittle, but still tastes delish.

Lemon (and Lime) Squares
Ingredients
Shortbread Crust
1/2 cup (1 stick) unsalted butter at room temperature (or if using salted, omit salt below)
1/4 cup confectioner's (powdered) sugar
1 cup all-purpose flour (or brown rice flour, if making it gluten-free)
1/2 teaspoon salt

Citrus filling
1 cup white sugar
2 large eggs
1/2 cup of lemon and lime juice (I used a mixture, but you can opt to use just one)
2 tablespoons grated lemon and lime zest (grate the lemons and limes BEFORE cutting and squeezing them!)
1/4 teaspoon of cinnamon
1/4-1/2 teaspoon vanilla
2 tablespoons all-purpose flour (or brown rice flour)

garnish with confectioner's sugar

** NOTE: after making this recipe I would consider doubling the citrus filling - I'm one of those people who like a 2:1 ratio filling to crust. If you're fine with a 1:1 ratio, keep it as it is! If you're like me, double the filling and let it bake a little longer (I'm guessing about 10-15 minutes, or until the filling has just set.

Directions
Preheat the oven to 350 degrees. Butter an 8x8 or 9x9 square pan (if using a 9x13 inch pan, consider doubling the recipe). With an electric mixer, beat butter and sugar until creamy. Add flour, cinnamon, and salt and beat until dough just starts to come together, but still resembles large peas (you should be able to squish the dough in your hand and it should stick together. Press into bottom of prepared pan, pierce all over with a fork. Bake for 18-20 minutes or until lightly browned around the edges, pushing down bubbles with a fork periodically, if they form. Remove from oven and cool slightly (on a rack, if you have one).
Butter and powdered sugar
Creamy butter and sugar; prepped flour, cinnamon and salt
Large peas, but still sticks together when squished
Pre-baked crust
Meanwhile, beat the sugar and eggs in electric mixer until smoother. Add lemon and lime juice, lemon and lime zest, cinnamon, vanilla, and stir to combine. Fold or beat flour. Pour filling into shortbread crust and bake for about 17-20 minutes, or until the filling has just set. Remove from oven and let cool (again, on a wire rack if you have one).
Eggs and sugar
Zested lemons and lime
In the oven!
(Almost) finished product
Serve by cutting into squares and dusting with powdered sugar.

* recipe modified from www.joyofbaking.com and Martha Stewart's "Cookies"


Slightly imperfect, but delicious nonetheless

Monday, November 21, 2011

Risotto-esque Barley with Mushrooms and Kale

I always forget how much I like risotto until I sneak a bite of it off someone else's plate in a restaurant. It's not something I'm ever inclined to make, it's not something my mother makes, and while it definitely is a comfort-y food, I rarely crave it. Something about risotto isn't quite nutty enough for my liking. And it can come dangerously close to tasting like baby food. While that doesn't bother me with something sweet like rice pudding, I'd like to still chew my meal (for the most part) while I still have teeth/before I need to get dentures, you? But still, I wondered... could the idea of risotto be co-opted and applied to another grain? Could a risotto-like dish be made with barley - a nuttier, crunchier, healthier substitute for rice? (it's low in fat, cholesterol-free, it contains tons of soluble and insoluble fibre, and it's a source vitamins and minerals like B3, B1, iron, magnesium and zinc, just to name a few. NOT gluten-free for any celiac's out there). I decided to venture and give it a go sans-recipe (apart from glancing at the proportions of barley-to-water). I think this one's a keeper! It makes a hearty, umami-filled vegetarian main, or a great side to fish, seafood, and chicken (maybe a bit heavy to pair with a red meat, but to each his own!). Many riffs can be made on it and I encourage you to explore! What would it taste like with a few baby tomatoes thrown into the pan at the last minute? What about some artichokes? or some chunks of good quality feta (not quite risotto-esque, but I'm sure delicious nonetheless!). Try it and let me know :) Happy cooking!


Risotto-esque Barley with Mushrooms and Kale

Ingredients
Olive oil
2 medium onions
1 cup pearled barley
lots of water (exact amounts specified in the directions)
1 bay leaf (optional)
about 2 cups of a variety of mushrooms, preferably at least half dried and reconstituted (so we can use the mushroom water later!)
Herbs e.g. thyme, sage, oregano (optional, but highly recommended)
2-3 cups of kale, swiss chard or spinach, central ribs removed, torn into smaller pieces
1 cup white wine
balsamic vinegar
salt
pepper
1/2-1 cup shaved parmesan (optional)


Directions
Make 1 cup of barley according to package directions (or according to MY directions!); saute a small-to-medium onion in 1-2 tablespoons of olive oil on medium heat until browned and softened, 5 minutes. Add 1 cup barley, 2 cups water and bay leaf, if using. Bring to a boil, then lower heat, cover and simmer for about 25 minutes or until most of the liquid is absorbed - check periodically to ensure the barley doesn't burn! (Note: You would usually stop here if you were just making straight-up barley). At this point, boil a few of cups of water and pour about 2 cups of water over your dried mushrooms. Let sit at least 20 minutes, or longer.

Saute those onions!
Putting the barley to simmer for 25 minutes (it's kind of like putting a baby to bed)
Don't dried mushrooms have a lovely, musky smell? It's reminiscent of the decaying leaves in a fall forest - all in a little nugget of joy! (I'm getting a little flowery with the words here, eh?) 

Once the barley is ready, fluff it with a fork. It is okay if there's a touch of extra liquid, you're going to add even more! Add about 1/2 of the broth from the soaked mushrooms (but NOT the mushrooms themselves!). Keep the barley on a low heat and stir occasionally ensuring the bottom doesn't burn. Once the liquid is reduced by about half (on my stove it took approximately 7 minutes) add the remaining mushroom liquid. Repeat again with any extra mushroom liquid, and the last time with about 1 cup of white wine. (Got it? Mushroom liquid, mushroom liquid, more mushroom liquid or water or chicken stock, white wine. If you find by the second one it's pretty mushy, skip the third and just add the wine!)
Fluffing
While that's going on, grab a saucepan, cut the remaining onion in chunks (not TOO small!), and again, saute in 1-2 tablespoons of olive oil on medium heat until soft, about 5 minutes. I chopped up some sage and threw it in here (it would be a good idea to add sage, thyme or rosemary at this point, about 2-3 tablespoons). Then add mushrooms, stirring occasionally until wilted and cooked through, about 7-10 minutes. Add about 1/3 cup balsamic vinegar and let bubble until most is gone, then add 1 cup white wine, scraping up bits from the bottom of the pan, and let wine cook down.
Onions and sage 
Adding the mushrooms
Bubbling wine concoction
Add the kale, stir in and cover until wilted, about 5 minutes (feel free to add a touch more wine or balsamic if it looks very dry!). Stir into barley. Add a TON of salt and pepper (if you weren't adding as you were cooking) and about 2 tablespoons of balsamic vinegar if you want it a touch more moist. If adding parmesan, stir in thoroughly while warm. Enjoy!
Pre-wilted kale
Kale and barley 
Stirring it all together
The finished product!